Friday, April 4, 2014

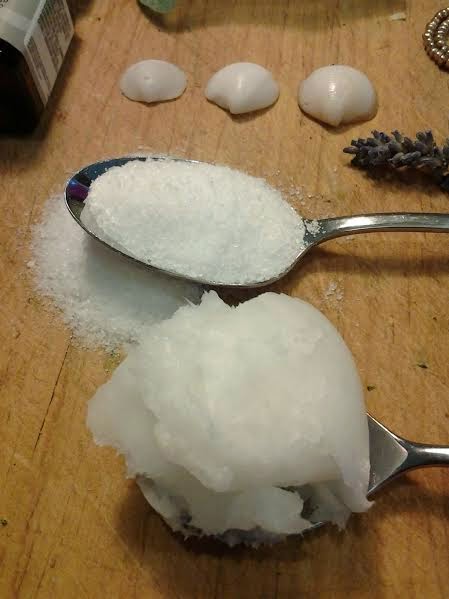
{Potions} Beachy Babe Salty Sea waves

AKA Mermaid Spray! Found via my favorite one of my favorite blogs free people. Love the blog, love the clothes, love, love, love the lace and hippie chic of it all. If any of you are like me, you're loving the fresh Spring sun but already dying in the fact that Spring is being a tease. Warm weather one day but rainy days every other day. Although the days have become longer, I still find myself chasing the sun everyday hoping and waiting until our nights will turn from dark and cold to warm sun filled nights full of adventures. Summer is coming my lovelies!!

For some sunshine inspiration I introduce to you...Mermaid Spray. For those summer sun and salt touched locks. It'll transport you to summer in no time.


This potion is simple. You'll need
* 1 cup of warm water
* 1 tbsp. sea salt
* 2 tsp coconut oil
* 2 tsp aloe vera gel (optional- this time around I didn't use any and it still turned out great)
* 5 - 10 drops of essential oil (I used a mix of lavender, sandalwood)


Combine all ingredients and then pour into an empty spray bottle for easy distribution throughout your hair!
Spray throughout your hair and scrunch your hair as you go and the rest will unfold.
At first spray, I knew I was hooked! I will be carrying this baby around in my bag always and forever now.
In need of a little pick me up? Spray some at the roots and ends of your hair to have that summer vibe follow you during these on and off Spring days.


Much love,
Laura


Sunday, October 20, 2013

Looking for Inspiration...

Every year around mid-October I wake up from my summer haze and realize the days have become shorter, dark sets in earlier after each passing week. The days more crisp and cold, leaves bright and falling from the trees. I spend my days here mourning and savoring the last dreds of summer. Autumn has come.
I really do try to fight it, but somewhere in between the end of September and early October my body does this whole shift. I start wearing more layers, mind you I am not a layering sort of person. I start eating massive amounts of carbs, lots of them. And I have the temptation to stay in bed, heater on, wrapped in all my blankets even on my most busy of weekends.
 I get a little crazy, all wrapped up, looking up craft blogs. I have a whole slew of ideas I want to try out this Autumn. Crazy decor ideas, interesting recipes. Jumbles and jumbles all over my brain. For right now I'd like to leave you all with some pictures I've been finding inspiring as of late. As well as some links to the blogs I have been crazy stalking these past few weeks.
Except recipes and crafts soon. It's Autumn of course!


 ( awelltraveledwoman )


 (Lee Martin Dickinson. Oak
Red Orb Sculpture Exhibition 2012, Leeson House, Dorset, Green Man Sculpture)


(101success)


 ( Apartment Therapy ) I love the fat round cactus on the table! The space looks so lived in and loved yet simple and still unique.


Grilled Fig Tartines, Honestly Yum ) I WILL make these someday!


alittlevintageapartment )

Current Blog Loves:
1. A Beautiful Mess
2. 3191 Miles Apart
3. Hummusbird
4. Adventures in Cooking
5. Little Seed Farm

I hope everyone had a wonderful weekend!
xxo Laura

 (This is silly, but I don't own any of the pictures in this post, unless otherwise noted* I will try and source all pictures as best as possible.)

Monday, September 9, 2013

{Fitness} Post Work day / Pre Workout - Easy Apple Cinnamon Toast

I've recently come back from a three week vacation with minimal workouts. Also- lots of unhealthy eating : / Tonight I'm finally getting back to my regular workout schedule! Exciting!!
Anyways - just got home from work, I needed something that would satisfy my want for a quick snack but also fuel me through my workout. What's better than protein and fruit?!


Apple Cinnamon Toast

Ingredients
2 slices of bread, thin enough for the toaster, I used Great Harvest's Honey Whole wheat..
2 tbsp peanut butter
1 med. apple
1 tbsp sugar
1 1/2 tsp cinnamon

Directions
Pop the slices of bread into the toast and toast for your desired amount of time!
While the bread is toasting measure and mix together the cinnamon sugar
Cut up your apple into thinly sliced pieces.
After the toast is finished spread the pb and add the cinnamon sugar and then top with your apple slices.
Enjoy!

xxo
Laura

Wednesday, June 26, 2013

It's been so long!

Sorry I'm not sorry. NEWS; I've started pastry school and I am so beyond in love with it. My blog has without a doubt been put on the back burner. But I am trying very hard to find some time to write a HUGE blog so I can talk about all of my adventures and put some of my pictures on! Because I have SO MANY PICTURES! Anyways... a long overdue update and hopefully I'll be back soon!


Thanks!
and Happy Summer Everyone!! (finally! :) )

Laura

Thursday, February 21, 2013

There'll be days like this

Well my mama told me, there'll be days like this

I have had a pretty bad day today. Basically spending my day off wrapped up tighter than a package on Christmas morning. Dinking around on my laptop, trying not to stress about the little things. I.E. the fact that Spring quarter is starting soon and I've been waiting to hear back from school so I know when to register for my baking program. Worrying about every last little thing that is so out of my control, I stress so much that your grandma doesn't have anything left because I've stressed it all away with my big little heart. So naturally I want to bake to take my mind off things and to make everyone else in the house fat and happy.
My vegan thing...it's going. I'm at a hardy 75% vegan most days. I don't drink dairy or eating meat, although I had a burrito today with chicken. I'm eating lots of vegetables and not reading the labels on breads because I know it's probably made with milk but I love it so much that I'm giving my 75% and that's enough for me.
Now, as of late, I've been on this massive coconut kick. Dried cranberries and coconut flakes in my oatmeal every morning. Coconut in my applesauce, yeah you read that right, APPLESAUCE. It's sweet, crunchy and delicious and for some reason these past couple of weeks I'm in love with it.
Back to being nasty and stressed, I'm a hermit skimming the internet when I stumble across this beautiful picture of toasty looking coconut macaroons and me, being a girl of impulse decisions I decide right then and there that some time today I am making coconut macaroons.

I hope everyone has had a stress free day! Happy Thursday!

Coconut Macaroons

Ingredients

3/4 cups (5 large) egg whites
2/3 cup granulated sugar
5 oz sweetened coconut flakes
5 oz unsweetened coconut flakes
1/2 tsp vanilla extract
1/2 tsp orange blossom extract
1/4 tsp almond extract
pinch of salt

Directions

In a heavy sauce pan combine the egg whites, sugar, and coconut and cook over medium-low heat. Keep an eye out and stir frequently until all the ingredients combine together. Remove from heat, stir in the vanilla, orange blossom, and almond extract. Set aside in a bowl and put it in the refrigerator to chill, about 30 minutes. Preheat the oven to 300°F.


When everything is combined it'll end up looking a little like steamed rice

Now here's where it gets tricky. I went for a palm-sized macaroon, mostly because I wanted to eat these with a cup of tea. But you can always go for a Tablespoon sized or any sized macaroon. The choice is up to you.
Put a piece or parchment paper down and let these cook for about 27 - 35 minutes
Even if they don't look toasty brown on the top, they're toasty all over.
Make up your favorite cup of tea and chow down on these little lovelies.


xxo

(Recipe adapted from skinnytaste )

Wednesday, January 30, 2013

Nothing Better

Favorite type of salad, I could eat this for the rest of my life. Goat cheese on toasted bread.
Europe, Summer 2012
 
"Tell me am I right to think that there could be nothing better
Than making you my bride and slowly growing old together"
'Nothing Better' - The Postal Service
 
Missing Paris, missing Summer, and really missing my freckles. 
Back to the present... There's nothing better than coming home at night, lighting a few of you favorite candles, and getting organized. There's just something about the routine, you know, the folding of clean clothes. Or making your bed, then have some fun moving around the furniture. Or in my case. Laying in bed and watching my favorite movie, while telling myself that I'll eventually go back to all that other stuff tonight.
 Fat rain drops are falling outside my window and I'm toasty inside.
Just thought I'd share some happiness.
 
xxo
 

Friday, January 25, 2013

An Update seemed like a good plan :P


I never thought I'd be saying this but hey! Gone vegan, check...guess what else, I'm not eating sugar! Baking...hmmm baking blog? Kind of hard to do. But I love it. I feel fabulous, so incredibly wonderful. I haven't felt this way in a long time. So I'm thinking I'll probably keep up with it. So expect some new recipes and a little less dessert-y prototypes for the time being! :)


I've been making this like crazy, I don't care, I love it. It's Soba noodles with a homemade mushroom - miso broth combined with extra firm tofu and chopped green onions.

 
I used soy based Miso paste and mushroom stock
that you can find at your local specialty foods store.   
 
Soba Noodles with Green Onions and Tofu
Serves 3-4 people or 2 w/large portions
 
4 tablespoons Miso paste
2 1/2 cups water
8 oz of firm tofu cut into bite-sized cubes
1 tablespoon instant mushroom stock
5 tablespoons chopped green onions
Desired amount of Soba noodles
 
Plop your water in your pot and bring it to a boil on the stove. Add in the soba noodles when the water has come to a boil. Also add in your miso paste and mushroom stock. Let the noodles boil for 6 - 10 minutes. Then set aside. Chop up your green onions and tofu and toss them into the pot. Evenly divide you noodlefest and enjoy!!

Ahhhh silliness! More recipes soon! As proof I shall link them and then do them in the oncoming future!!
 
My link button is not having it today~
- Homemade Coconut Cream Pie Lara Bars
 
Ta da! Ta da!
Have a good day everybody
 

Friday, January 4, 2013

Thai Green Curry Rice (Being Vegan day three!)

Eating fruits and vegetables has been incredibly easier than I had even thought it to be. :) Which is great! Especially with the new year, almost everyone I talk to is making resolutions and thinking about getting their health back on track. If all things go well this month I've been thinking about going a version of vegan for the rest of the year. I love to bake and although I've worked at a vegan bakery and sometime I bake vegan at home, I don't think I'd be able to give that up. And cheese! I LOVE CHEESE, oh and honey. :) Everything is better with a little honey. But for the month of January I'm veganveganvegan and that's rad. Anyhooooow here's a recipe that my dad and I cooked up last night. {Another thing I love about my whole household going vegan is we have more family time together. Whether it be...between passing in the hallways, we check up on each other, ask how we're doing with this whole new vegan thang. Or it be over the stove when we're preparing a meal together (like last night!) I never realized it till now, but it's definitely something I've missed.


Thai Green Curry Rice
Prep: 20 minutes, Cook: 12 minutes

NOTES:
* Make sure you cook the rice before hand! We didn't read through the recipe, and learned that the hard way
* Coconut extract mixed in almond or rice milk makes a great substitution in recipes that call for coconut milk. It has a lot of fat so it you're looking for low-fat ideas....^^^ try this one!


1/3 cup vegetable broth
1 onion, cut into 1/2-inch cubes
1 red bell pepper, cut into 1/2-inch cubes
1 yellow bell pepper, cut into 1/2-inch cubes
2 cloves garlic, crushed or minced
1 to 2 tablespoons Thai green curry paste
2 cups coarsely chopped napa cabbage
1 cup broccoli florets
1 cup cauliflower florets
1 cup sugar snap peas
1 tablespoon regular or reduced-sodium soy sauce
4 cups cooked long-grain brown rice
1 tomato, cut into 1/2-inch cubes
1 tablespoon coarsely chopped fresh Thai or common (field) basil
1 tablespoon coarsely chopped fresh cilantro
1 cup almond milk or rice milk
1 teaspoon coconut extract

Directions;

Place the broth in a large saucepan along with the onion, red and yellow peppers, and garlic. Cook over medium heat, stirring occasionally, for 5 minutes. Stir in 1 tablespoon of the curry paste, or up to 2 tablespoons for a spicier dish. Add the cabbage, broccoli, cauliflower, snap peas, and soy sauce. Mix well, cover, reduce the heat to low, and cook until the vegetables are tender, about 5 minutes.

Add the rice, tomato, basil, cilantro, almond milk and coconut extract.
Stir well, then cook until heated through, 2 to 3 minutes
Serve hot, on plates or in bowls.


It turns out to be a bit like a stir-fry with a little saucey stuff at the bottom. And it makes enough for about five or six people, so plenty of leftovers for us!

xxo
Laura


 ( Found on forksoverknives )

Thursday, December 27, 2012

Happy Hoildays from LifeislikeaCupofCake!

Happy Holidays everybody! I hope everyone has had a great time so far, and here's for the New Year!
So, I'm excited and nervous to say...that for the next 28 days I'm going to be going VEGAN! Wowza. Big leap, but since we're bringing in the new year I thought I'd try something new! (and my dad is doing with me as well...he's the one who convinced me to do it ;) )
In my mind it's a pretty crazy idea, but I'm trying to get more in touch with a healthier side. I've been eating pretty badly lately (especially since the holidays have started) and it's affecting me for the worse (I just found out my blood pressure levels have increased).
I'll be posting updates and some recipes, probably not a lot will involve baking or pastry but I'll try my best to squeeze some in.
Let me know how you're Holidays have been going! :)

xxo


Friday, December 14, 2012

Tis the season tralalalala falalala

I've stumbled across this really amazing blog spoonforkbacon, and I can't stop searching through their lovely pages for recipes! All of them, fabulously plated, all the recipes look absolutely delish, and they're posted with great pictures and easy to follow directions.
Ok, the real reason to my ohmygod I'm in love, love, love with this blog deal. A friend of a friend of a friend posted drippy droppy-drool worthy pictures of her home made Chocolate Peanut Butter Popcorn balls. And as I sat there drooling on my keyboard, I had to pick my jaw up off the floor. I decided on the spot, heck-yes I'm making these. Now let's get on the internet and make these. What am I doing tonight? Making bite size popcorn balls and avoiding my fav. mug post, (mostly because I'm incredibly indecisive) and can't decide which ones are my favorites.


Bite-Sized Chocolate Peanut Butter Popcorn Balls

 Makes 24-28
Ingredients:
5½-6 cups popped popcorn, lightly salted
 ¼ cup Reese’s Peanut Butter Chips, optional
2/3 cup granulated sugar
2/3 cup light corn syrup
2 tablespoons honey
2/3 cup smooth peanut butter
2 teaspoons vanilla extract
1 - 16 oz bag milk chocolate chips
 
Directions:
1. Place the popcorn and peanut butter chips into a large bowl and set aside.
2. Place the sugar and corn syrup into a saucepan and bring to a boil.
3. Once the mixture has reached 240°F (soft-ball stage) add the honey, peanut butter and vanilla.
4. Stir together until fully combined.
5. Pour the sugar mixture over the popcorn mixture and begin folding together until all of the popcorn mixture has been evenly coated and distributed.
6. Allow the mixture to cool slightly.
7. Once the mixture is cool enough to handle, lightly grease your hands and form golf ball sized popcorn balls.
8. Place the formed balls onto a sheet pan lined with parchment and allow to cool completely.
9. Place chocolate chips in the microwave to melt, 2-4 minutes or until melted all the way
10. Roll each ball in the melted chocolate and place back on the parchment paper
11. Once the popcorn balls have set, 2-4 hours, wrap them in plastic wrap or wax paper before serving.
(Adapted from spoonforkbacon )

More posts soon!
xxo

Monday, November 26, 2012

thanksgiving thanksgiving thanksgiving

a night full of laughs and great food, to give thanks and look around the table only to realize you have everything you need sitting next to you, and on a plate in front of you.

to hide identities I thought of a nifty way to do so! a still homey picture with some-what censored faces... ( I forgot to ask) + (we're running from the CIA....hehe just kidding)


Here are a few of my new favorites...

Cardamom Ice Cream
makes 1 to 1 1/2 quarts


2 cups heavy cream
1 cup whole milk
3/4 cup sugar
pinch kosher salt
1 teaspoon ground cardamom

Put all the ingredients into a small, heavy-bottomed saucepan with a lid and cook, uncovered, over medium heat, whisking occasionally to dissolve the sugar. Remove from the heat. Cover and let the mixture steep at room temperature for 20 minutes. Pour the micture into a shallow pan or bowl and place in the refrigerator to chill completely, 1 to 2 hours.

When the mixture is cold, pour it into an ice cream maker and process according to the manufacturer's instructions. Using a rubber spatula, transfer the ice cream to an airtight glass or plastic freezer container. Cover tightly and freeze until the ice cream is firm, at least 4 hours.


I made these little tartlets with the leftover filling


Pumpkin Brûlée Tart
Makes 2, 13 x 4" tarts

Dough;
1 1/2 cup flour ( I did half all purpose, half whole wheat)
1 1/2 teaspoon sugar
3/4 teaspoon kosher salt
1/2 cup cold, unsalted butter, cubed

Whirl together flour, sugar, and salt in a food processor. Add butter and pulse into pea-size pieces. Drizzle 1/3 c.very cold water over crumbs and pulse just until moistened.
Turn dough onto a work surface and gather into a ball, turning to combine any dry crumbs.
Divide dough in half, form each into a disk, wrap in plastic wrap, and chill at least 30 minutes.

Filling;
2 cups pumpkin puree, canned or homemade
2 large eggs
3 large egg yolks
1 1/2 cups half-and-half
3/4 cup sugar, plus more for caramelizing top
3/4 teaspoon kosher salt
1 teaspoon ground ginger
1 teaspoon ground cloves
1 1/2 teaspoons ground cinnamon
 
 Cut dough in half and shape each piece into a rectangle. Roll each out on a lightly floured work surface into a rectangle measuring about 7 by 16 in.

Preheat oven to 375°. Lay each dough rectangle over a 4- by 13-in. tart pan with removable bottom.

Lift and lower dough into pan (pushing can cause cracking). Trim edges flush with rim of pan, using your thumb or a metal spatula.

Cut pieces of parchment paper to fit into tart shells with about 1 in. overhang on all sides. Fill shells with pie weights. Set pans on a rimmed baking sheet.

Bake until dough is starting to brown, 25 to 30 minutes. Let cool on sheet until only slightly warm, then carefully pour out pie weights and remove parchment.

Meanwhile, blend remaining ingredients (except sugar for caramelizing) in a large bowl. Pour custard mixture into prepared tart shells, dividing evenly.

Reduce heat to 325°. Bake tarts until custard is set and is slightly puffed at edges, about 30 minutes. Cool 1 hour, then chill at least 2 hours and up to 2 days, covering with plastic wrap once cold.

Remove tarts from pans and set on a serving platter. Sprinkle tops of tarts generously with sugar. Pass flame of a blowtorch over tops until sugar melts and turns golden brown. Let sugar cool until hard, then cut each tart into pieces.


xxo

tossing around some ideas

hand-crafted clay flowers on the side of the canal bank in Brugee, Belguim (from summer)


I'm always looking for new and fun ways to inspire myself to make new blog posts. I've been thinking about doing a post about my favorite teas and mugs, since you know, tis' the season to be cold and rained on. Maybe even snowed on! (SNOW, GUYS! SNOW!) Throwing around the idea for fun kitchen gadgets and some grand winter essentials. Maaaybe winter DIY's? :) Fav cookbooks even? Stay updated ladies and gents, I'll be pumping out the fun posts soon.

Tuesday, October 30, 2012

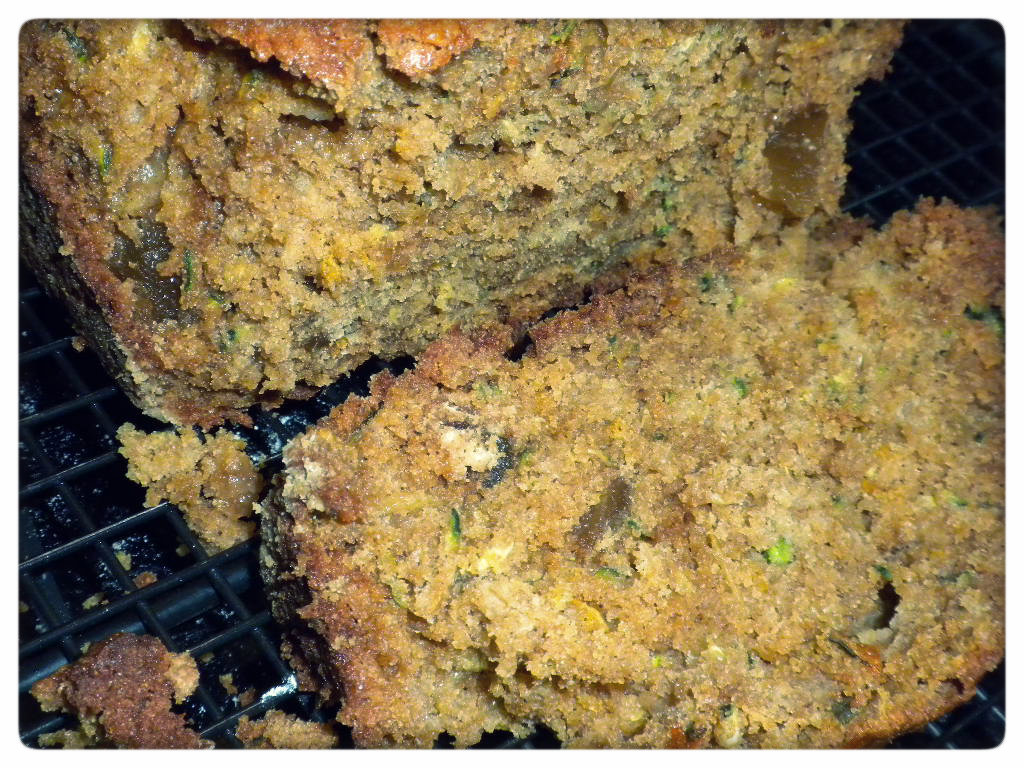
Lemon Ginger Zucchini Bread


As of late I've had two things on my brain, vegetables, and healthy baking. I have decided that if I'm going healthy this is going to be my extreme favorite of guilty pleasures. Lemon Ginger Zucchinni Bread! It's hearty, and has whole wheat flour in it! As well was candid ginger.

I found it on one of my most favorites of  favorited blogs. 3191milesapart. They the are two lovely ladies who wrote this wonderful book A Year of Mornings and a few other new collaberations. Maria Alexandra Vettese (MAV) and Stephanie Congdon Barnes (SCB). Their blog as well as their books are absolutely beautiful, I would recommend checking them out! Maybe even spending the day looking throughout their blog like I do.


All of these things tie into eachother! The colors, green zucchini, yellow ginger, the brown sugar and whole wheat flour add to it and create a smooth and beautiful brown that really comes out when the bread browns on the top in the oven. Zucchini and Whole wheat = healthy, Lemon = tastey, and Ginger = Laura's favorite accent spice EVER. Combimed together equals the most delicious savory and a little sweet bread loaf I have yet to come across. Bake it. Eat it. Share it. Then freeze it!


I used Whole Wheat Pastry flour instead of Whole Wheat, because whole wheat has a thicker texture, where as the pastry flour is thinner so you'll still get the whole wheat flavor without a grainy texture. I also used the grater on our food processor and found that it was as easy as one, two, three! No cut fingers, and you can avoid the zucchini that can turn to mush when using a hand held grater.


Lemon Ginger Zucchini Bread

1/2 cup (1 stick) unsalted butter, softened
1 cup dark brown sugar
2 eggs
2 cups grated zucchini
1 cup all purpose flour
1 cup whole wheat pastry flour
1 teaspoon baking powder
1 teaspoon baking soda
1/2 teaspoon kosher salt
1 teaspoon cinnamon
2 teaspoons lemon zest
1/2 cup crystalized ginger ( found mine at PCC, I believe you can find it at Trader Joe's too)


Preheat oven to 350 degrees F. Butter and flour a large loaf pan, 9" x 5".

Place grated zucchini in a towel and wring out as much moisture as possible. Cream butter and brown sugar in a mixer until fluffy. Add eggs, mix to combine, add zucchini.

In separate bowl, mix together flours, baking soda and powder, salt and cinnamon. Toss in crystalized ginger and lemon zest. Make sure the ginger pieces are coated with flour, so they won't stick together.

Add the dry to the wet ingredients and stir to combine. Fill the prepared pan with the batter.

Bake for 45-60 minutes or until toothpick comes out cleanly and the loaf is nicely browned on top.

Store bread at room temperature, or slice up and freeze for a nice treat later on!


From: (3191milesapart)


Wednesday, September 19, 2012

Almost Fall


Fall has been visting us in Seattle. Seeping through the defined line of summer and turning into fall, through the leaves changing colour and getting darker earlier.
Now is the time for light jackets, long pants, and boots, boots, boots. Then comes the rain and having everything be dark by 5 or 6:30pm.
I start school on the 24th. Not so sure that I'm ready for it, but I know I'll go into it with an open mind and open arms.


Loving the sunshine, but craving the curl-up-with-a-book and warm socks weather. This month I've got popcorn on the brain.


Mmmm mmmm yummy

Honey Caramel Corn
 
10 - 12 cups popped popcorn (around 1/2 cup kernels)
1 cup toasted pine nuts
1/4 cup butter
1/2 cup dark brown sugar
1/2 cup honey
1 teaspoon vanilla
1/4 teaspoon baking soda
Sea salt
 
 
Melt butter, sugar and honey over medium heat in a medium saucepan. When mixture reaches a boil, reduce heat and simmer for three minutes. Take off heat and stir in vanilla and baking soda (the mixture will foam a little bit when you add in the baking soda) In a large bowl, toss popcorn, nuts (we went sans nuts this time) and caramel mixture to thoroughly coat. Preheat oven to 250 degrees. Spread popcorn on a parchment-lined baking sheet. Sprinkle with seat salt. Bake in oven for 45 minutes, making sure to stir at the halfway point. Allow to cool, break apart and store in an air-tight container.


(Adapted from: 3191 Miles Apart)

Wednesday, September 5, 2012

Dungeness Crab Cakes with Orange Tarragon Butter Sauce


Monday night I successfully hosted a dinner party!

With two of my very best friends, kind of a last (but not really the last) shi-bang before we all go our different ways for college. We made a three course dinner plan and all of it turned out fabulous. For appetizers I made Crab Cakes, Jenny (on the left!) made a delicious Caesar Salad, and for the main course, Simona (on the right!) made Steak Gyros! Mmm mm mmmmm! So good!

It was so great to hang out and to cook together. In Simona's words...in the kitchen I'm known as a little bossy (oops!) But I didn't get that vibe this time. It was all laughs and lots of pictures. :) In between courses we huddled together onto my tiny, tiny, couch and watched episodes of Supernatural. Two episdoes later...."anyone hungry?" "Let's make Gyros!" Four episodes later, "Ice cream?" Yes.
So...we sat at the table for the Crab Cakes and then migrated to the couch after that. But that's what I love, a well planned dinner party with lots of Supernatural episodes, lots of laughs, and memories I'll never forget. Here's to all of the dinner parties to come!


Dungeness Crab Cakes   (Prep Crab Cakes first, then make sauce)
with orange tarragon butter sauce
Serves 4 as a main course. 6 to 8 as an appetizer.

10 ounces cooked Dungeness crabmeat, fresh or frozen
1 1/2 cups panko bread crumbs
3 tablespoons diced red bell pepper, we used orange! ahhh food police!3 tablespoons diced shallots
3 tablespoons chopped parsley, skipped it this time
3 tablespoons fresh lemon juice
1 tablespoon dry sherry
1/4 cup heavy cream
1 large egg
Pinch kosher salt
Pinch ground white pepper
Dash Tabasco sauce
Pinch celery salt
1/2 teaspoon paprika
4 tablespoons clarified butter or canola oil


Prep
Thaw crabmeat if frozen. Gently squeeze crabmeat to remove excess moisture, breaking up any larger pieces.

In a large bowl, mix together 3/4 cup of the panko (reserving the remaining 3/4 cup for coating), bell pepper, shallots, parsley, lemon juice, sherry, cream, egg, salt, pepper, Tabasco, celery salt and paprika. Combine thoroughly to make a batter. Add crabmeat and mix well. Divide mixture into 8 (or 12) balls. Using hangs, form patties and coat with the remaining panko. Refrigerate until well chilled, about 1 hour.


** While your crab cakes are chilling in the refridgerator lets switch to making the Orange Tarragon Sauce!

Orange Tarragon Butter Sauce
Yield: 1 cup

1 teaspoon canola oil
2 tablespoons finely chopped shallots
1 cup Chardonnay
1 cup orange juice
1/2 cup heavy cream
2 tablespoons fresh tarragon leaves (about 5 sprigs), chopped, or 1 tablespoon dried tarragon
1/4 pound unsalted butter at room temperature, cut into small pieces
Kosher salt
Freshly ground white pepper


In a wide 2-quart saute pan, heat oil over medium heat and saute shallots until translucent. Add wine and orange juice. Bring mixture to a roiling boil. Reduce heat to medium and boil gently, stirring occasionally, until mixture reduces to about 3/4 cup of liquid, about 15 to 20 minutes. Add cream and bring to a boil again. Reduce heat to medium and boil gently, stirring occasionally, until about 3/4 cup liquid remains, about 10 to 12 mintues. Add tarragon and stir. Add butter a piece at a time, stirring until well incorporated. Remove from heat. Season with salt and pepper to taste. Serve immediately.

** Back to the Crab Cakes!

In a large skillet or nonstick pan, heat clarified butter or oil over medium-high heat until it begins to smoke. Reduce heat to medium and add crab cakes. Sear until coating is golden brown and lightly crispy, about 3 to 4 minutes on each side. Add more butter or oil as needed to the pan to prevent crab cakes from sticking.
Serve with Orange Tarragon Butter Sauce. 


Enjoy everyone!


xxo Laura

Tuesday, September 4, 2012

Do you guys like the new layout?

It's very pink.....but also something new! I'll try it out and see how it goes.


Sorry I've beem MIA, but I have stories and recipes and my oh my. Everything good :) Headed to bed now, but new posts start tomorrow!
Excited? I AM.

xxo Laura

Wednesday, July 11, 2012

Homemade Honey Lavender Icecream


Molly Moon's at home! Two weeks before summer started... we've been working on ice cream in my Culinary Arts class and I had a need, a need to make ice cream at home. I had a couple titles in mind, having looked... no, more like dug through the entire cookbook section at Barnes and Noble for the book I came for and alas! It was no where to be found. But luckily I stumbled across this lovely! And swiftly it was bought and taken home, and has now been used for it's very first time for my favorite Molly Moon's recipe, Honey Lavender. 

Although I'm still debating with myself on wheather or not its fair to post the recipe for Honey Lavender online.

~ It turned out delicious, but it needed to be churned longer, seeing as it had the consistency of soft serve ice cream and started to melt after being out of the freezer for about 30 seconds. Alas! I won't give up until I've made the perfect icecream!!!

Monday, July 2, 2012

Marshmallows are messy.

Unexpected.
Fun nevertheless, but definitley unexpected.

Ooey Gooey MARSHMALLOWS. With the up coming fourth of july I wanted to make homemade s'mores makings (minus the chocolate). That began today with my first marshmallow makings. Let me tell you, totally, utterly unexpectable. Good, and I'm extremely proud of myself for making marshmallows at home. Got the mallows down, now on to the graham crackers.

My crafty solution to an unclipable thermometer. Tada!
Marshmallowies becoming Marshmallows!

The mess that follows when transferring from bowl to pan


Almost finished product. Setting in the pan before being cut up.


Marshmallows Makes 36 medium or 16 large
Time Commitment: 2 hours

2/3 cup water, divided
3 (1/4 ounce) envelopes unflavored gelatin
1 cup granulated sugar

1 cup light corn syrup
1 tsp pure vanilla extract
1 cup confectioners' sugar

Toppings ~1 cup confectioners' sugar, sifted
1 cup unsweetened cocoa powder, sifted
1 1/2 cup sweetened shredded coconut, toastedPrepLightly oil the inside of an 8 by 8" pan with canola oil. Generously coat with confectioners' sugar, set aside.

Pour 1/3 cup of the water into the bowl of a stand-mixer. Sprinkle the gelatin over the water, and let stand for about 10 minutes, or until gelitan has softened.

In sauce pan, off heat, combine remaining 1/3 cup water and granulated sugar, corn syrup, and salt. Place the pan over medium-high heat. Clip a candy thermometer to the inside of the pan and make sure it does not touch the bottom. Cook mixture without stirring until it reaches 240 °F. Brush down the sides of the pan with a pastry brush, dipped in water, to gently wipe away any residual sugar crystals.

With the mixture on low speed very carefully add the hot syrup to the softened gelatin. Add the vanilla, increase the speed to medium-high and beat for 8 - 13 minutes, until mix becomes very white as well as stiff and sticky.

This is where you prepare yourself for things to get messy. (See pictures below for reference.)Spread mixture into prepared pan using a lightly oiled spatula. Harder than it sounds. An extra pair of hands would be highly recommended at this point. With wet hands, press batter evenly into the corners of the pan. Set aside for 1 hour, until firm and cool.


Sift powdered sugar into a small bowl. Run a wet knife around pan and remove marshmallows, then cut them up, to whatever sizes of your choosing.


How to Store:
Layer with wax paper. In an air-tight container for up to 1 month. :) :)


Although this recipe is incredibly messy... it is entirely worth it! I've been testing (eating is more like it) the mallows and yum, yum, yum! They're goooood. I didn't cut the up, kind of just pulled pieces off.


Saturday, June 30, 2012

Orange Spice Sipping Chocolate Review


Also known as Theo hot chocolate! :)


I've fallen in loooooove. Sweet, yummy dark chocolate loooooooove. Hot chocolate....in June? Say Whaat? Well here in Seattle, it's muggy, rainy, and icky. It seems like every sunny day we get, we're then punished with two more weeks of dark and rainy weather. I say, no bueno! Here's the scoop; this past week I've been babysitting my Culinary Arts Chef's daughter. :) And of course she has all of these fun and extremely cool foodie things. She had a container of it open, told me to try it, and I did and instantly fell in love with it, and she gave me an unopened container!! How sweet is that?
It's as thick as making your own homemade hot chocolate tends to be but you can also vary the thickness of it by how much chocolate you put into each serving too! Tehehe, well I wanted to express my love for Theo's Organic Orange Spice Sipping Chocolate and all of it's thick, chocolately loveliness it contains. :) It has 11 servings and is also fairly inexpensive!


One Serving calls for
1/2 cup milk (or any dairy alternative) heated in a small pot over medium heat until steaming
Then add 3 Tbs of the sipping chocolate (or more if you want it thicker), whisk that in
and then drink away! :)
Yum nom


(Theo picture borrowed from Fig and Walnut)

Wednesday, May 9, 2012

Blueberry Muffins!

The sun is shining, the birds are chirping and SPRING IS HERE FINALLY!!!!! We've being waiting for so long. It's time to whip out those dresses, skirts, and sandals to go soak up those sunny rays. I was looking through this blog 3191 Miles Apart, which is a absolutely fabulous blog, they have a book based off the blog that started it all, and it's one of my favorite books, full of pictures of course. But not just any pictures, the most fun, inspiring, and relaxing group of pictures I've ever seen. These two women met and had similar styles and decided to post pictures of their mornings each day. The similarities between both pictures each day if fascinating.

Ah-ha! Okiee, back to my point! Blueberry muffins...yum, yum, yum! Actually though, I surprised myself...these are goood! The first day I made them Tuesday, I ate two for breakfast and then two more afterschool... No bueno. At that point I decided it was time for them to go, and I brought them and left them at a friends house. ; ) I was looking through their blog, and I found a good-looking blueberry muffin recipe, and then I was inspired. It required whole wheat flour, which I love whole-heartedly, but I was looking for that lovely white and blueberry speckled muffin tops, so I went on and looked for another recipe. That's when I stumbled across the Smitten Kitchen, and that's when I FOUND IT. BLUEBERRY MUFFINS. I instantly thought blueberry muffins? YUM. It was settled.

I did change a couple things...instead of lemon zest, I used orange zest. I added in 2-4 drops of tangerine oil, as well as a little lemon juice and I added in more blueberries, it got to the point where some of my muffins didn't even have blueberries.

Perfect Blueberry Muffins

Makes 10 - 12 standard-sized muffins

(Skip the organics if you want! Either way works :) )


5 tablespoons unsalted butter, softened
1/2 cup organic cane sugar
1 large organic egg
3/4 cup organic plain yogurt (I used Nancy's Organic)
1/2 teaspoon fresh lemon juice
2-4 drops tangerine oil Optional!!1 1/2 cups all-purpose flour
1 1/2 teaspoon baking powder
1/4 teaspoon baking soda
1/4 teaspoon salt
1 cup blueberries, fresh or frozen (if frozen don't defrost) (I used frozen! Works just fine!)

Topping
1/4 cup organic cane sugar
1/2 an orange zest

Preaheat oven to 375℉. Line a muffin tin with 10 paper liners or spray each cup with nonstick spray. Beat butter and sugar with an electric mixer until light and fluffy. Add egg and beat well, then yogurt, juice and oil. Put flour, baking powder, baking soda, and salt in another bowl and mix. Then add half to the batter until combined, mix in last half. JUST MIX UNTIL FLOUR BITS DISAPPEARS. No more than that! Gently fold in your blueberries. The dough will be thick, which is why an ice cream scoop is a fabulous thing to use when scooping your muffins! You will want the muffin cups to be about 3/4 of the way filled. Toppings! This is when you should put it on! Sprinkle a generous amount of sugar over the top of each muffin, then zest a bit of the orange on top of that on each muffin. Bake for 25 to 30 minutes, until tops are golden and a tester inserted into the center of the muffins comes out clean. Let cool on rack (or eat instantly!) Yum! Enjoy!